For those who have operated a WordPress website in the past, you know how problematic they can be. Database errors. Severe security vulnerabilities. Spam.
While WordPress has significantly improved in the past several years, in terms of both functionality and administration, most WordPress sites do not actually need the dynamic functionality all of the time. This site is one of them — even if this site were managed by multiple people, producing a static bundle is a better choice than running a full LAMP stack.
Why use WordPress in 2025?
WordPress is a great website builder. While there has been a push toward alternatives, particularly following the drama from last fall, there are few fully open-source and self-hostable alternatives that offer robust WYSIWYG block based website editing.
Sure, you can use something like Framer or Webflow (not to Mention Wix, Squarespace, and Weebly), but you are beholden to paying a monthly fee to just keep your website up and running. And you have less control around how these sites are hosted and you do not have access to a rich ecosystem of extensions to make your website more powerful.
There’s also the familiarity component. I’ve been a frequent WordPress user since 2007, back when setting up a site required you to either use a hosting provider that you’d FTP your files to. If you wanted to do local development, you’d have to install something like XAMPP to get your very own Apache+(MySQL)+PHP stack. Or you could stand all of these services up locally on a Linux machine.
Why static host?
The biggest benefit to static hosting your WordPress site is the lack of maintenance that’s required. You get a lot of control over your site if you choose this method and you’re able to ignore (depending on the way you set this up) things like security patches and scaling.
Static sites are great even if you experience a significant volume of traffic.
Options for static hosting
Once you have your static bundle, there are a few popular options for hosting, including:
- nginx/Apache static web hosting. Set up a Linux VPS on your favorite hosting provider, then install
nginxorapache2on the machine. Configure a virtual host so the server serves traffic appropriately based on the visitor’sHostheader (basically what they type into the address in their browser).
This works great for a simple website without much additional configuration. You can add HTTPS support by running something like certbot to get a TLS certificate (for free with LetsEncrypt).
If you want to enhance your site’s performance and scalability, you can put it behind a service like Cloudflare. This is very easy to do if you have full control over your domain name (just switch out the nameserver to use a hosted zone on Cloudflare).
If you use Cloudflare and want to maintain an encrypted connection between your nginx server and Cloudflare, be sure to create a TLS certificate with DNS validation (not the default option).
-
S3 static web hosting. This is a fantastic option if you already have an account with a provider like AWS, Google Cloud Platform (using GCS), or Scaleway (if you’re looking for an EU-hosted alternative).
This method involves creating a bucket for your website files and then enabling the static web hosting option. If you’re using a provider like AWS, you will also want to set up a Cloudfront distribution to put the static site behind. This will give you load balancing, TLS termination, and an edge CDN (significantly improving site performance for users who are not in the same location as you).
It can be tricky to use this method, however, especially when it comes to setting the proper cache control settings on your files. -
GitHub Pages / GitLab Pages. Your favorite version control registry also supports static web hosting out of the box. This is a great free option but it also comes with the fewest options for control.
Running a local WordPress instance
Besides hosting, you need a place to run an actual live WordPress instance with a full LAMP stack. Like hosting options, there are several dozen ways you accomplish this.
In 2025, one of the easiest options is to use Docker + Docker Compose to run your site locally. To do this, create a compose.yml file locally that looks like this:
# compose.yml

services:
  wordpress:
    image: wordpress:latest
    ports:
      - 80:80
    volumes:
      - ./data/www:/var/www/html
      - ./ssg_output:/var/www/html/public_static/
    environment:
      WORDPRESS_DB_HOST: db
      WORDPRESS_DB_USER: wordpress
      WORDPRESS_DB_PASSWORD: password
      WORDPRESS_DB_NAME: wordpress
      PHP_INI_UPLOAD_MAX_FILESIZE: 30M
      PHP_INI_POST_MAX_SIZE: 30M
    depends_on:
      - db
    extra_hosts:
      - yoursitelocal.local:172.18.0.3 # change this to your container's IP
  db:
    image: mariadb:latest
    ports:
      - 3306:3306
    volumes:
      - ./data/db:/var/lib/mysql
    environment:
      MYSQL_ROOT_PASSWORD: password
      MYSQL_DATABASE: wordpress
      MYSQL_USER: wordpress
      MYSQL_PASSWORD: password
If you are running this anywhere other than on your local machine, then I would suggest also changing the passwords to something more secure. This is not intended for production deployments, but is totally suitable for locally building a site that you’ll turn into a static bundle.
Before we continue, there are a few key things to note in the compose.yml file:
- WordPress stores files in
/var/www/html, so I’ve added a volume mount to./data/www, so I can backup the output of the site data with git. - SimplyStatic exports files to
/var/www/html/public_staticby default. I also mount this path to./ssg_outputso I can easily check in the site changes to version control, as well as run the deployment script (below). - MySQL creates database files on disk. While these files are not especially portable, it’s helpful to have them in a format that I can readily backup. Just be careful to move them to a similar system (same OS and CPU architecture) if you’re going to run this elsewhere.
- I’ve also gone ahead and added the
extra_hostssection. This is necessary for SimplyStatic to use the WordPressxmlrpcendpoint to crawl the entire website (and find all of its pages and assets). This needs to match the IP address of the container (see below).
As I noted in the last bullet point, you’ll need to make sure to update the extra_hosts section to use your container’s IP address. To do this, open a terminal and run:
# first see which containers are running.
> docker ps --format '{{.Names}}'
goodairsoftwarecom-wordpress-1
goodairsoftwarecom-db-1

# then figure out which IP address your wordpress container is assigned
> docker inspect \
  -f '{{range.NetworkSettings.Networks}}{{.IPAddress}}{{end}}' goodairsoftwarecom-wordpress-1
172.18.0.3
Save the file and then restart Docker Compose.
Compatibility Alert
As of March 2025, extra_hosts is not supported by Podman Compose. If you are running Podman, consider an alternative solution to run WordPress like Local WP.
Running the Docker Compose file
Once you’ve set everything up, simply start the Docker Compose file by navigating to the directory with your file in it and running:
docker compose upGenerating a static site bundle
Regardless of the option you choose to host your site, you’ll need to generate a static bundle of your site. This bundle contains all of the HTML, CSS, and JavaScript files required to serve your site, as well as any image or video assets you’ve uploaded.
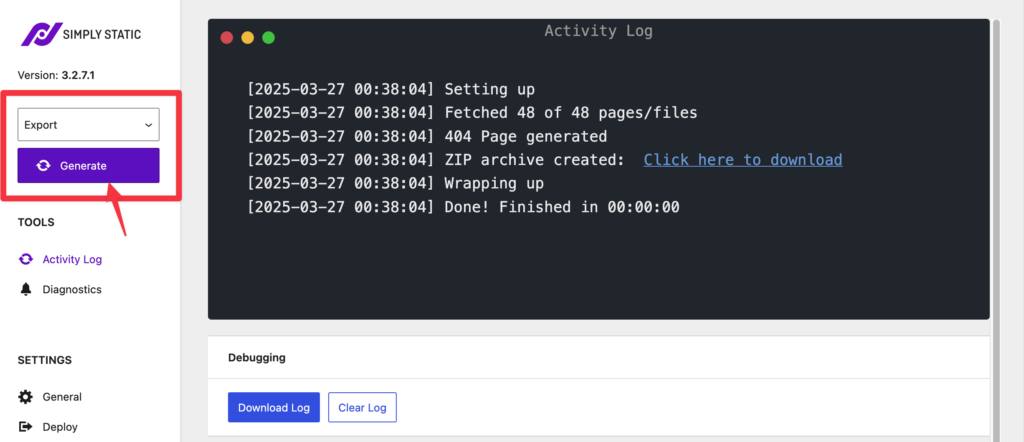
I personally use Simply Static, since it’s free option works quite well and is easy to use. Once you have the extension installed and enabled, click Generate to create the bundle, then click Click here to download.

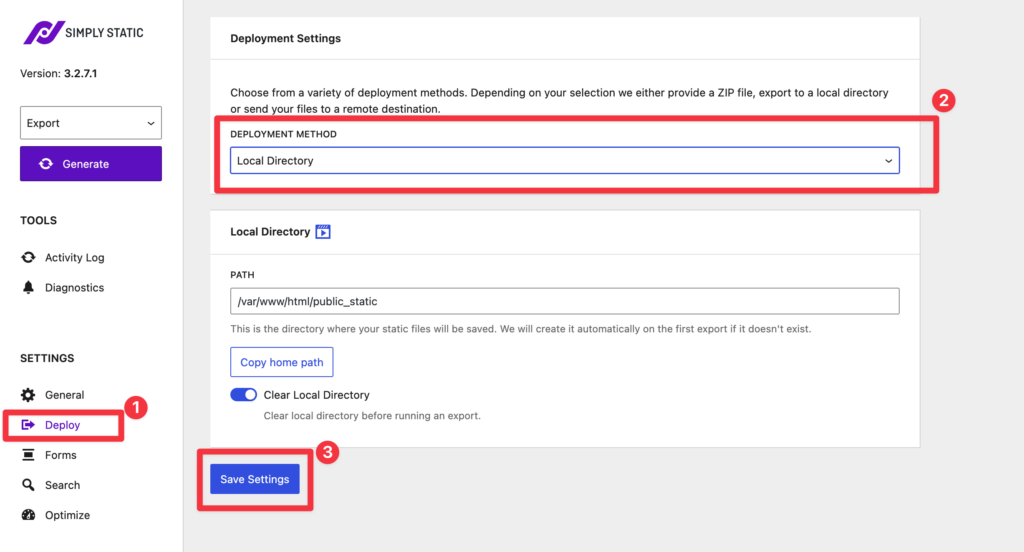
If you’ve set up the ssg directory, you may want to switch the deployment method to use Local Directory instead.

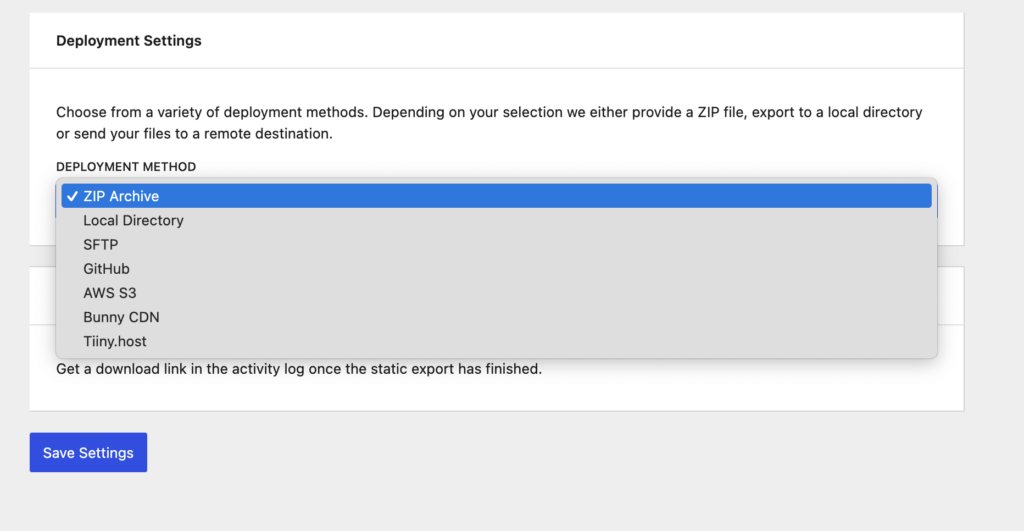
If you pay for SimplyStatic Pro, you can use SFTP, GitHub, and S3 directly. No need to run any scripts locally. This is a great option if you’re working with multiple users or a non-technical content team.

Deploying your site
Now that you have your site, you can easily deploy it to your server. You have two options:
- Download the ZIP file, uncompress it locally and then upload via SFTP.
- Run a deployment script with the
Local Directorydeployment method.
For the easiest long term experience, I’d suggest creating a simple deployment script in the same directory.
#!/bin/bash
rsync --delete -r --progress ssg_output/* user@your-server:/var/www/html/yoursite.com
Save the script as something like copy-to-server.sh and then mark it as executable chmod +x copy-to-server.sh. Then run the script to copy your files over:
./copy-to-server.shAppendix: Fixing File Permissions Issue
One thing I noticed when trying to run the Generate feature with the volume mounted is that it had the wrong permissions (and thus was empty).
To fix this, set the file permissions to 777 on the ssg_output directory.
sudo chown 777 ssg_outputThe astute reader might notice that this gives full permission to all users (read-write-execute to owner, group, and everybody). While this is certainly not how things should be stored on your web server, it is fine to do this in a directory on your local machine before uploading with rsync.
With the rsync command provided in the one-line shell script, it will not preserve any filesystem metadata and will instead revert to the defaults of the OS that you’re uploading to. This is usually 644 for files and 755 for directories.